Particular to your
installation
-
Bike: GS500 2k no oil cooler
-
I connected the power of the dash to one of the already existing “light plugs” for the old cluster
-
use a tester to check polarities on cables(although the unit doesn't care about how you connect the cables)
-
-
Magnet screw
-
making use of a space on the rotor in case no magnet screw works for your particular case
-
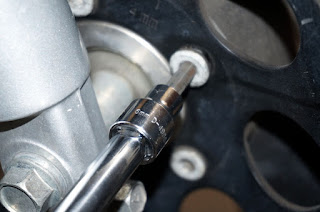
Please do not use a regular allen (L one) on the rotor bolts (if this is your case), it's highly probable you'll damage the bolt, use an allen socket
-
Use thread lock to put back again the bolt
-
Evaluate locating the sensor on the rear wheel vs the front wheel
-
-
Tire size
-
17 inch, 57 cm diameter from tire to tire side across the rim, in mm*3.14 = 1790
-
-
High temperature set to 195 celcius, damage one to 210
-
First shift light set to 6000, second one to 11000
-
First trip reported 8.5 km, tracing a path on google maps trowed 8.4km so I find it very accurate.
Functions
-
air temperature
-
engine temperature, max engine temperature
-
speed, max speed
-
distance
-
running time, moving time
-
rpm, max rpm
Hard Data
-
wheel magnet pickup cable length from connector to connector: 139cm
-
kit contents
-
two different mounting brackets depending on your handle bar diameter
-
dash unit
-
dash to mounting bracket part
-
speed, temperature and spark sensors
-
power cable
-
3 different bolts and a magnet to put in a rotor empty space, check provided instructions or on the website
-
Magnetized Bolt size
-
first: length 2cm, socket size 10mm
-
second: 2.4cm, socket size 10mm
-
third: length 2cm, socket size 12mm
-
-
-
-
Kit version, differences between versions
-
please check as there are different versions of the kit, depending on if it is a air cooled vs water cooled and the mounting options for the dash
-
-
spark signal cable
-
Lenght: almost 2 meters...
-
-
spark plug heat (air cooled model)
-
Internal diameter of the air cooled: 11.7mm
-
Lenght of the cable including sensor and connector: 60cm
-
-
wall width for the plastic pieces to hold the dash on place: 3mm
Tools you will need
-
Phillips screwdriver (the + one)
-
Thread lock for the different screws
-
3/32 allen for the screws on the back of the dash
The good and the
nice
-
Made in the USA
-
USA based support: Thanks to Jack Ashby for the support and quick email handling.
-
Fair price
-
power for the dash is independent of how polarity is connected (I do still prefer to connect the red to 12v, black to ground)
-
nice conectors, seem to be waterproof
-
lot of functions
-
nice backlight
-
four different magnet options for the wheel pickup signal
The sad and the ugly
-
Spark heat sensor cable on the small side
-
The screw for the piece that mounts to the handle bar is on the small side... while trying to get into the bolt the bolt went out and fall into those “you'll never see again” places (just like under the fridge)
-
no trail tech or vapor sticker for your bike :(
-
The mounting bracket could be more sturdy
-
piece that attachs to the back of the dash destroyed by the own bolt, seriously those pieces could use some extra plastic
-
-
“I'm not sure” connection between the wheel pickup signal and cable
-
exposed cable
-
The “I'm extremely
picky” that actually doesn't matter (or it does?)
-
Spark signal cable (tachometer)
-
My max rpm registered where 13,700 rpm when I know the redline of my motorcycle is around 11, I will play with the connection to the spark cable.
-
resistor cable was not provided on my kit
-
-
Just two of the connections that go out from the dash are labeled in my particular unit
-
magnet sensor and wheel speed
-
a more flexible cable so you can wrap it around the brake hose
-
a better way to put on place the magnet sensor for the wheel speed
-
-
Temperature sensor
-
the temperature sensor cable is too small
-
I might switch it from the spark plug to another position... I don't know how much it will last if you change the spark plugs often... e.g. if you are troubleshooting; as as least in my case it bent a lot under the spark plug
-
-
Ammount of time for the dash going blank is not configurable
-
this is my fault, just be cafeful: Connector should slide in easy, watch out you can bend a pin if you slide the connector into the receptacle in angle
-
a way to attach a screen for daylight visibility under the sun would be nice (and to prevent the unit from overheating)
-
replacement sensors are expensiveSome photos about the kit contentsPlease use a Allen socket if you are removing an Allen screw, normal L Allen will just damage the bolt, put thread lock after replacing.
back of the box
dash and supporting bracket
temperature sensor on d7ea9 spark plug
Kit contents
a little bit of sanding prior to add JWeld to hold the magnet on place, please consider locating the sensor and magnet on the rear wheel.
orange light that turns on selected temperature or first shift rpm


1 comentario:
Menarik sekali, perlu saya coba ini..
kebetulan lagi cara tentang hal ini.
anime terbaik
Publicar un comentario