sábado, 1 de agosto de 2015

Trail tech dash review


Particular to your installation
  • Bike: GS500 2k no oil cooler
  • I connected the power of the dash to one of the already existing “light plugs” for the old cluster
    • use a tester to check polarities on cables(although the unit doesn't care about how you connect the cables)
  • Magnet screw
    • making use of a space on the rotor in case no magnet screw works for your particular case
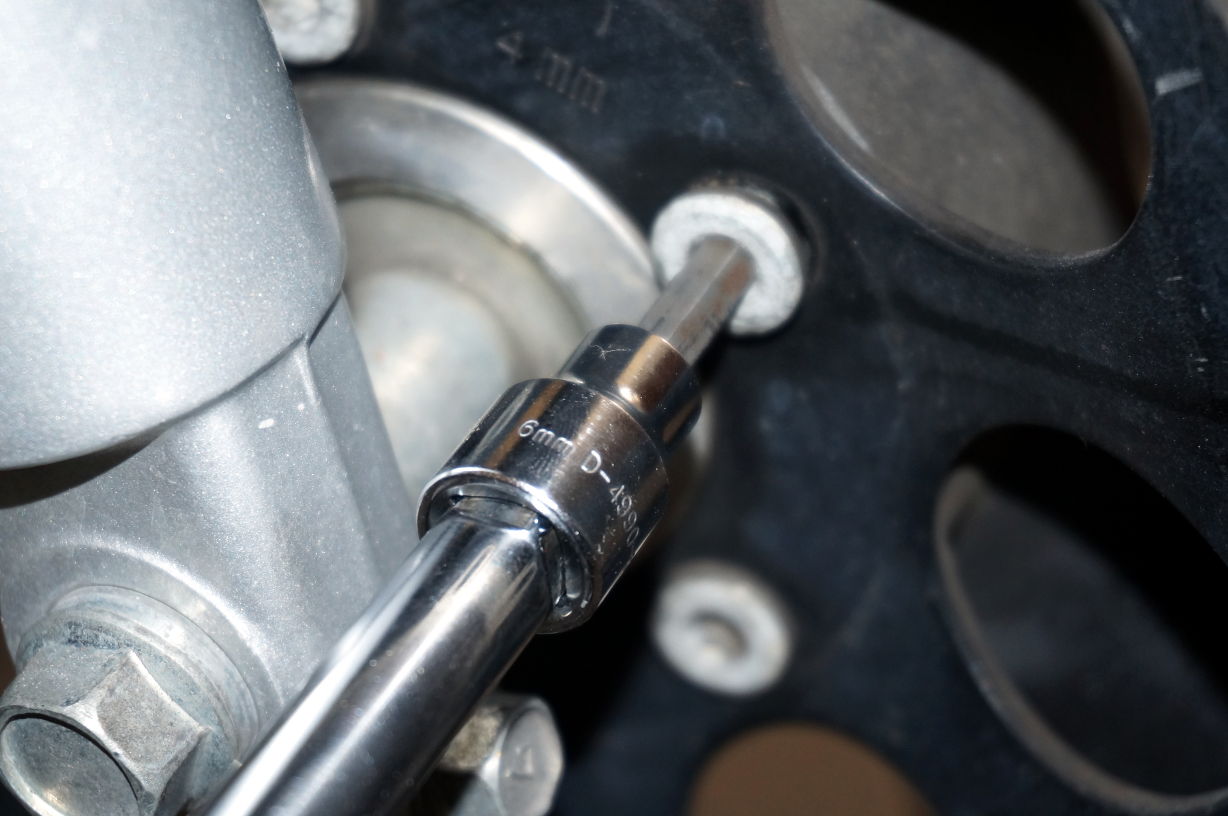
    • Please do not use a regular allen (L one) on the rotor bolts (if this is your case), it's highly probable you'll damage the bolt, use an allen socket
    • Use thread lock to put back again the bolt
    • Evaluate locating the sensor on the rear wheel vs the front wheel
  • Tire size
    • 17 inch, 57 cm diameter from tire to tire side across the rim, in mm*3.14 = 1790
  • High temperature set to 195 celcius, damage one to 210
  • First shift light set to 6000, second one to 11000
  • First trip reported 8.5 km, tracing a path on google maps trowed 8.4km so I find it very accurate.

Functions
  • air temperature
  • engine temperature, max engine temperature
  • speed, max speed
  • distance
  • running time, moving time
  • rpm, max rpm

Hard Data
  • wheel magnet pickup cable length from connector to connector: 139cm
  • kit contents
    • two different mounting brackets depending on your handle bar diameter
    • dash unit
    • dash to mounting bracket part
    • speed, temperature and spark sensors
    • power cable
    • 3 different bolts and a magnet to put in a rotor empty space, check provided instructions or on the website
      • Magnetized Bolt size
        • first: length 2cm, socket size 10mm
        • second: 2.4cm, socket size 10mm
        • third: length 2cm, socket size 12mm
  • Kit version, differences between versions
    • please check as there are different versions of the kit, depending on if it is a air cooled vs water cooled and the mounting options for the dash
  • spark signal cable
    • Lenght: almost 2 meters...
  • spark plug heat (air cooled model)
    • Internal diameter of the air cooled: 11.7mm
    • Lenght of the cable including sensor and connector: 60cm
  • wall width for the plastic pieces to hold the dash on place: 3mm

Tools you will need
  • Phillips screwdriver (the + one)
  • Thread lock for the different screws
  • 3/32 allen for the screws on the back of the dash

The good and the nice
  • Made in the USA
  • USA based support: Thanks to Jack Ashby for the support and quick email handling.
  • Fair price
  • power for the dash is independent of how polarity is connected (I do still prefer to connect the red to 12v, black to ground)
  • nice conectors, seem to be waterproof
  • lot of functions
  • nice backlight
  • four different magnet options for the wheel pickup signal

The sad and the ugly
  • Spark heat sensor cable on the small side
  • The screw for the piece that mounts to the handle bar is on the small side... while trying to get into the bolt the bolt went out and fall into those “you'll never see again” places (just like under the fridge)
  • no trail tech or vapor sticker for your bike :(
  • The mounting bracket could be more sturdy
    • piece that attachs to the back of the dash destroyed by the own bolt, seriously those pieces could use some extra plastic
  • “I'm not sure” connection between the wheel pickup signal and cable
    • exposed cable

The “I'm extremely picky” that actually doesn't matter (or it does?)
  • Spark signal cable (tachometer)
    • My max rpm registered where 13,700 rpm when I know the redline of my motorcycle is around 11, I will play with the connection to the spark cable.
    • resistor cable was not provided on my kit
  • Just two of the connections that go out from the dash are labeled in my particular unit
  • magnet sensor and wheel speed
    • a more flexible cable so you can wrap it around the brake hose
    • a better way to put on place the magnet sensor for the wheel speed
  • Temperature sensor
    • the temperature sensor cable is too small
    • I might switch it from the spark plug to another position... I don't know how much it will last if you change the spark plugs often... e.g. if you are troubleshooting; as as least in my case it bent a lot under the spark plug
  • Ammount of time for the dash going blank is not configurable
  • this is my fault, just be cafeful: Connector should slide in easy, watch out you can bend a pin if you slide the connector into the receptacle in angle
  • a way to attach a screen for daylight visibility under the sun would be nice (and to prevent the unit from overheating)
  • replacement sensors are expensive

    Some photos about the kit contents 

    Please use a Allen socket if you are removing an Allen screw, normal L Allen will just damage the bolt, put thread lock after replacing.


    back of the box


    dash and supporting bracket

    temperature sensor on d7ea9 spark plug

    Kit contents


    a little bit of sanding prior to add JWeld to hold the magnet on place, please consider locating the sensor and magnet on the rear wheel.


    orange light that turns on selected temperature or first shift rpm


miércoles, 29 de septiembre de 2010

Nomenclatura química inorgánica iPhone


Características
Es una aplicación para iPhone o iPod que se puede adquirir en la app store de Apple, es una aplicación unicamente en español.
La aplicación permite ingresar los elementos y los indices de un compuesto químico inorganico y obtener los nombres del compuesto en uno o mas de los siguientes esquemas de nombramiento:

  • Clásico
  • Stock
  • Estequiometrico
La aplicación simplifica los compuestos y calcula las valencias que esta utilizando el compuesto para nombrarlo, de modo que los siguientes compuestos todos serán nombrados como oxido ferroso:
  • Fe1O1
  • Fe2O2
  • Fe100O100

Las valencias usadas por los compuestos son incluidas en la respuesta para todos los binarios.
La aplicación del mismo modo si un compuesto cumple con ciertas condiciones indicara el nombre para el compuesto; si tiene la forma que utiliza cierto compuesto pero no cumple con todas las reglas procedera a indicar el motivo por el cual no es un compuesto valido.

Binarios
La aplicación tiene capacidad de reconocer los siguientes tipos de binarios:

  • Oxidos
  • Peroxidos
  • Superoxidos
  • Anhidridos
  • Hidruros
  • Sales haloideas
  • Hidracidos
  • Sales de no metales


Ternarios
La aplicación tiene capacidad de reconocer los siguientes tipos de ternarios:

  • Hidroxidos
  • Sales Acidas
  • Oxacidos
  • Oxisales neutras
  • Sales neutras
  • Sales de amonio

Casos especiales
Nombre de compuestos que tienen un nombre particular, ejemplos:

  • H2O Agua
  • H2O2  Agua oxigenada
  • AuAg  Oro blanco
  • Etc


Tomas de pantalla


Para futuras versiones

  • Cuaternarios
  • Incluir valencias usadas para los ternarios

martes, 29 de septiembre de 2009

Simple oracle cursor loop example

Intro
The script will create all the needed objects for this example, I assume you have a user with the proper permisions to execute the example.

Script
/*This anonymous pl/sql block is to drop the table, so anytime we want to run the script it will run without problems*/
BEGIN
--drop the table
EXECUTE IMMEDIATE ('DROP TABLE number_text_pair');
--if there is some problems like it is the first time so there is no table to drop just do nothing
EXCEPTION WHEN OTHERS THEN NULL;
END;
/

/*create the table*/
CREATE TABLE number_text_pair
(
number_value integer,
text_value varchar2(4000)
);


/*create some test data*/
INSERT INTO number_text_pair (number_value, text_value) VALUES (1,'one');
INSERT INTO number_text_pair (number_value, text_value) VALUES (2,'two');
INSERT INTO number_text_pair (number_value, text_value) VALUES (3,'tree');

/*anonymous pl/sql block for iterating number_text_pair's data with a cursor*/
DECLARE
--declare the cursor
CURSOR cur_example is
SELECT *
FROM number_text_pair;
/*create a record to store the data of the table,
note the datatype of the record as row type of cur_example*/
rec_example cur_example%ROWTYPE;
BEGIN
--open the cursor to iterate it
OPEN cur_example;
--loop until there is a condition to stop
LOOP
--fetch a row data from the cursor and store it in rec_example
FETCH cur_example INTO rec_example;
--if there is no more data in the cursor then exit
EXIT WHEN cur_example%NOTFOUND;
/*output the values of the cursor to the console
note the use of . to access the fields of the record*/
DBMS_OUTPUT.put_line('Number value is: ' || rec_example.number_value || ' text value is: ' || rec_example.text_value);
END LOOP;
--close the cursor
CLOSE cur_example;
END;
/
/*the slash is to instruct the program running the script to continue after a pl/sql block,
it is not necessary when you are executing a DML statement*/
Script output
After executing the script you should see

Number value is: 1 text value is: one
Number value is: 2 text value is: two
Number value is: 3 text value is: tree
A simpler and more robust version
There is another construction to iterate over cursors, it is the for construction, a simpler more robust pl/sql to iterate the cursor is:
/*anonymous pl/sql block for iterating number_text_pair's data with a cursor*/
DECLARE
--declare the cursor
CURSOR cur_example is
SELECT *
FROM number_text_pair;
BEGIN
/*note the simpler construction, there is no need to open and close the cursor,
also there is no need to declare the record*/
FOR rec_example IN cur_example LOOP
DBMS_OUTPUT.put_line('Number value is: ' || rec_example.number_value || ' text value is: ' || rec_example.text_value);
END LOOP;
END;
/

sábado, 26 de septiembre de 2009

Replace on file with another in other directory in linux

Story

It's a long story, the thing is that my documents filesystem became corrupted and there were a lot of song that were not able to be reproduced.
I didn't know which songs were until I played them so do it by hand was not practical.
I get to create to scripts that allow me to replace all my favorites songs in my music folder with a backup of the song in a different folder.
There were some restrictions
  • The songs had to have the same name
  • The song to be replaced and the copy can be in diferent folders
The scripts

the solution is composed of two parts, a command that I run in console and a script, the command is

find -type f -exec ./replaceFiles "{}" \;

the script with name replaceFiles is

cp "$(find /another/directory/ | grep $basename "$1")" "$1" -v

How they work

When you first execute the command, for every file in the directory it is runned in it calls the script replaceFiles passing as parameter a file in the directory, the script search for the file within another directory by its name (basename "$1"), if it founds it then it copies over the original file "$1".

miércoles, 23 de septiembre de 2009

The future of cell phone

Is taking some time to people to realize that the social networking applications are not adds to their cellphones and computers but that the latter are the medium to former.
And as computers (that is a cellphone) continue to shrink the medium will become invisible and everybody will be connected.
An universally society universally connected, always...

Intel i7 turbo boost

People at marketing are genius or the average buyer is stupid.
So instead of selling a 3ghz processor that can run at 2ghz to save power they sell a 2ghz processor that can operate in turbo mode at 3ghz and everybody drops their jaws.
Tell me is just me.

viernes, 3 de julio de 2009

Slackware 13 rc1 review (32 and 64 bits)

It's been a long time since my last slackware review, this time I've been tempted to do a review of the rc1 of slackware 13 because of x86_64 support, I'll try to do a comparative between booth versions.
Booth versions will be installed as virtual machines on vmware server over kubuntu 8.04 64 bits (I had some freeze troubles with booth versions of slackware and I don't know if they are related to the fact that they were running on vmware).

Machine specs
  • Intel Q6600 quad core processor overclocked at 3.0 Ghz
  • 4 Gb of RAM
  • intel dg35ec motherboard
  • Kubuntu 8.04 64 bits
  • VMware-server-2.0.0-116503.x86_64
  • WD 250Gb SATA hard disk
Virtual machine specs
  • 1gb of ram
  • 2 processors asigned
  • 8 Gb hard disk pre allocated optimized for performance (not security)
Slackware isos
Installation process
  1. Wellcome screen: press enter
  2. select your keyboard: press 1 to select keyboard, hit enter to use the US keyboard (I selected the spanish layout)
  3. login as root: write root and press enter
  4. partition your hard disk: write cfdisk at the console, hit enter and make the partitions on your harddisk, for this test the hard disk will be partitioned 8250 mb single partition for / filesystem and a 337 mb for a swap partition
  5. begin the installation process: write setup on the console to run the good old slackware installer
  6. select the swap space option: the swap partition you have created should appear, press ok, the installer it's going to ask you to check for bad blocks, I choosed no, the installer it's going to show you a resume screen, press enter
  7. select linux partitions, in my case there is only a root partition, press enter, the installer it's going to ask you for the format mode, I selected quick format
  8. Select filesystem for your hardisk..... mmmm...... let's try ext4 :), the installer shows you a resume screen
  9. select the slackware 13 installation source, in my case a slackware cd or dvd, option 1 and press enter, select auto for the scan of the medium
  10. In my case I would make a full install of slackware, I select everything and press enter, in the prompt mode for packages installation I selected full
  11. and... and... ... it's freezed (for x86_64) version, try again with reiser fs and freeze, again with huge.s kernel and ext2 and it worked...

    test for 32 bits version will be with the huge.s kernel and the ext2 filesystem... and... and... it's freezed, well, let's try with ext4... freezed... reiserfs... freezed, hugesmp.s and ext4... and it worked...


  12. make usb flash boot, selected skip
  13. install lilo, selected simple
  14. frame buffer, selected 800x600, 256 colors
  15. extra kernel parameters: pressed enter
  16. selected no for utf-8 console
  17. lilo destination: mbr
  18. mouse configuration: imps2
  19. gpm configuration, selected yes
  20. configure your network: yes; hostname: slack; domainname com; ip address setup, selected dhcp; dhcp hostname: pressed enter; confirm setup: yes
  21. startup services: press enter and select the defaults (netatalk, fuse, hald, innetd, messagebus, pcmcia, syslog, sshd)
  22. try custom fonts: no
  23. hardware clock set to utc, no, selected my country
  24. desktop manager: kde
  25. select password for root: no (you should do it, and don't forget it)
  26. selected exit to reboot
  27. write reboot on the console and press enter
slackware 32 vs 64 times
  • installation time (only packages from the moment it install the first A section package to the make usb flash boot screen): 64 -> 20.5 min; 32 -> 27.55 min
  • first boot time (from lilo to login): 64 -> 38 secs; 32 -> 43 secs
  • second boot time (the first time it do some process that it only does the first time): 64 -> 30 secs; 32 -> 33 secs
  • first startx time (from enter to akonadi report): 64 -> 30 secs; 32 -> 64 secs
  • startx after logout from first startx (from enter to akonadi report): 64 -> 20 secs; 32 -> 20 secs

Default desktop
The default desktop is KDE version 4, kudos to kde team.

Curiosities:
  • new bootup image
  • The welcome screen of the installer iso for the 64 bits version of slackware says version 12.34567890 instead of 13 rc1 (although I found the numbers of 1 to 0 a nice detail :P), also it says that the machine has to be at least pentium pro :P

domingo, 23 de noviembre de 2008

Interesting phrases

miércoles, 3 de septiembre de 2008

Google's Chrome

Well, it has been a lot of talk about google's chrome, about the new UI and about the approach to build a web browser.
But people hasn't pay enough attention to another piece of chrome that's also really interesting, I'm talking about the comic presentation.


This "comic" is also impresive, at least for the IT people, for the ones of you who hasn't RTFC it's time to do it and agree or disagree with me.
From my point of view it's a remarkable example about how to explain:

  • Design of an application focused on threads
  • Issolation (inherited from the treads) that make the browser more reliable and secure
  • Security achived through the use of sandboxes (for plugins, each page, and javascript), even explains some approaches to deal with phising
  • Javascript: one of the cornerstones of the new browser, if we can call it that way, betweeen others we can find that the code is compiled rather than interpreted, making chrome the ferrari of the javascript
  • User interface: even if the address bar has been taked only 1 inch down it means that it belong to the tab rather than the tab to the browser and the bar to the browser, minimalistic, where are the file, edit menus? do you miss them?? I don't!
  • memory administration (direct benefit of the new architecture of the browser)
  • Garbage collection, and approaches to implement it
  • psychology: people wan't to see thing's that they don't want other to know they saw, I'm talking about: incognito window
  • what an application should be: "if you can ignore the browser we have made a good job"
  • security levels and how read|write permissions should be granted
what I think:

  • want to write something for all the browsers but not every browser support the same features, use gears (of course, if chrome become the new defacto browser, or everybody adopt the new standard)
  • more faster javascript: why? before we have two approaches, desktop or web, if the web browser become more faster to handle the javascript aka the new language for client side business logic where's the division?, instead of doing desktop applications, let's blur the division between these ones and stay were we are kings (talking bout google) web.
  • let's call it a os so we can throw it to microsoft (don't know who started this but it's a stupid) and make publicity
  • it's open source, it's faster, it's better (IMHO of course), but the first one limit the adoption of the foreones, so we are making bigger the difference between the open source project's who addopt it and the close source browsers.

lunes, 4 de agosto de 2008

Programacion / Code writing

La programacion es el arte de no perder los estribos.

Code writing is the art of no losing your head.

miércoles, 2 de julio de 2008

Galletita de la fortuna / From fortune

Lo siguiente resume todas las leyes fisicas y humanas:
1. No se puede empujar haciendo uso de una correa.
2. No hay comida gratis.
3. Asi como lo tienen, lo obtienen.
4. No puedes ganarlos todos, pero puedes estar seguro que los puedes perder todos.

The Following Subsume All Physical and Human Laws:

1. You can't push on a string.
2. Ain't no free lunches.
3. Them as has, gets.
4. You can't win them all, but you sure as hell can lose them all.

sábado, 5 de enero de 2008

Miedo / Fear

No es que puedas vender miedo a la gente si no mas bien que con miedo le puedes comprar.

It's not like you can sell fear to the people but you can buy them with it.

domingo, 30 de diciembre de 2007

Risa / laugh

La relacion entre aquello que te provoca risa y aquello a lo que dedicas tu tiempo y pensamiento es directa.

The relation between those things that make you laugh and those things in which you think and spend your time is direct.

Schrodinger

La vida es un evento de schrodinger, en el momento que te tomas el tiempo de ver hacia donde va se decide por un camino.

Life is as schrodinger event, in the moment that you pay attention to where it goes, it takes one way.

sábado, 7 de julio de 2007

Oracle 10gR2 on Ubuntu Server 7.04

Introduction
Oracle is one of the most (if not the most) famous DMBS, in many places you are going to be asked to develop using Oracle for the persistence.
But the installation of oracle is big, and also slow, I have installed Oracle on my Linux box every time I install a fresh Linux Version and its fine, if you don't start the enterprise manager it can moderate on resources, so to resolve the problem I am going to install Oracle 10gR2 on a Ubuntu Server 7.04 on a VMware virtual machine.
I have choose Ubuntu Server because of it size and the package manager that makes install the minimal X requirements easy.

Installation of Ubuntu Server 7.04
I am going to install ubuntu from the ubuntu dvd, this dvd can install a command line system, a sever and the default ubuntu.
change your language hitting F2, and your keyboard with F3, after hitting on the option "Install a server", the installation for the server is console based, the steps are:
  1. Selection of the language for the installation process
  2. Selection of a country
  3. Enter a hostname
  4. Partition of the disk: you can do this step in 3 ways
    1. Guided (take all disk)
    2. Guided and use LVM
    3. Manual
  5. After you setup your partition layout the installer ask you about your timezone
  6. Select if your time its set to UTC or not.
  7. Enter the full name of the default user, this is not the login name but the full name.
  8. Enter the login name, the one that you are going to be asked for in the login of the system
  9. Enter the user password
  10. Re-enter the user password
  11. After 7 minutes of software installation, the installer told me that only the base system was installed, that if I want to install ubuntu desktop, lamp server or dns, I didn't choose anything and hit enter
  12. After the reboot, in the first boot you will need to install x packages to install oracle, I choose fluxbox because of it's size and footprint.
    $sudo apt-get install fluxbox xserver-xorg xfonts-base fluxbox xterm
    this will give you a very lightweight server
  13. you can start the X environment with startx now.
note: if you are working on vmware, you may want to make a clone of your ubuntu server, so may do clones of this virtual machine if you want to use a lightweight server later.

Installation of Oracle 10gR2
note: this process installation is highly based on Akshay Mehta's tutorial
now it's time for the installation of oracle, but for a perfect installation it will be necessary to do some previous steps:
  1. update package repository
    $sudo apt-get update
  2. install some necesary packages
    $sudo apt-get install build-essential libaio rpm lesstif2-dev alien libstdc++6-dev
  3. Create the users and groups oracle needs:
    $sudo groupadd oinstall
    $sudo groupadd dba
    $sudo groupadd nobody
    $sudo useradd -g oinstall -G dba,nobody -d /opt/oracle -m -s /bin/bash oracle
  4. Set oracle user’s password
    $sudo passwd oracle
  5. Append user oracle’s .bashrc with PATH and ORACLE:BASE,HOME and SID information as oracle user
    $sudo su oracle
    $nano .bashrc
    and append to the file
    export ORACLE_BASE=/opt/oracle
    export ORACLE_HOME=$ORACLE_BASE/product/10gR2
    export ORACLE_SID=orcl
    export PATH=$PATH:$ORACLE_HOME/bin
    return to your normal user
    $exit
  6. Make sure the correct kernel parmeters are appended to /etc/sysctl.conf
    kernel.shmall = 2097152
    kernel.shmmax = 2147483648
    kernel.shmmni = 4096
    kernel.sem = 250 32000 100 128
    net.core.rmem_default = 262144
    net.core.rmem_max = 262144
    net.core.wmem_default = 262144
    net.core.wmem_max = 262144
    fs.file-max = 65536
    net.ipv4.ip_local_port_range = 1024 65000
  7. Set the kernel parameters or reboot
    $sudo /sbin/sysctl -p
    1. Set /etc/security/limits.conf
      $sudo nano /etc/security/limits.conf
      and append to the file
      * soft nproc 2047
      * hard nproc 16384
      * soft nofile 1024
      * hard nofile 65536
  8. Create symbolic links this is because the location of some commands are hard codded on oracle scripts, so ubuntu would look more like an enterprise rpm based distro.
    $sudo ln -s /usr/bin/awk /bin/awk
    $sudo ln -s /usr/bin/rpm /bin/rpm
    $sudo ln -s /lib/libgcc_s.so.1 /lib/libgcc_s.so
    $sudo ln -s /usr/lib/libstdc++.so.6 /lib/libstdc++.so.5
    $sudo ln -s /usr/bin/basename /bin/basename
  9. Mount the Oracle10g CD and run the installer
    /runInstaller -ignoreSysPrereqs
    note: I have had problems running the installer as another user than oracle, if you have kde installed, you can try with sudo, or start a konsole with kdesudo -u oracle konsole, or log as oracle user and run the installer from there.
    Installation of oracle is: next, next, next..... only take care of assign a password when you are prompted to.
  10. Enable the orcl database to start when you call dbstart
    $sudo nano /etc/oratab

    and change :N to :Y
  11. to start the services as oracle user do:
    $dbstart
    $lsnrctl start
    if you want to start the isqlplus web console do:
    $isqlplusctl start
    if you want to start the enterprise web console do:
    $emctl start dbconsole
  12. remember to stop the services before shut down the machine.

miércoles, 4 de julio de 2007

Slackware 12 Review

Introduction
I'm big fan of Slackware Linux, I have used it since the 9.0 version, and I am very happy with this distribution, in the beginning was challenging to setup mostly because I was a newbie, today I am installing and reviewing the recently released version 12 in my toshiba l35-sp1011

  • Celeron M 1.6Ghz 1Mb cache L2
  • 1.5 Gb DDR2 Ram
  • 40GB 5400rpm sata HDD
  • ATI mobility radeon X300, 128 Mb Ram (shared)
  • ATI chipset

this release of slackware comes with many changes, from the release announcement:

  • Kernel 2.6.21!!!
  • XFCE 4.4.1 for the lovers of this lightweight desktop
  • KDE 3.5.7 latest release of the beautiful and customizable K Desktop Environment
and many others, you can check the change log here, now from what has been my experience, this is a very overhauled release of slackware, when you insert your DVD or CD to install the distro there is only the hugesmp option, after you hit enter the installation is pretty straightforward and typically Slackware you must:

Installation
  1. hit 1 after the kernel messages end to select your keyboard layout, default is qwerty us.map (English US) or hit enter if you don't want to change it.
  2. login as root, there is no password
  3. Setup your hard disk partition layout with fdisk or the more easier cfdisk
  4. type setup to start the setup program
  5. in the installation program you can change the keyboard layout again
  6. addswap: this step set up your swap partition so it can be used if you don't have enough ram
  7. target: configure your / partition, the installer is going to ask you if you want to format the partition, or keep the existing filesystem, if you want to format the partition you can use ext2, ext3, reiserfs, jfs and xfs for the root partition.
  8. after this if you have fat or ntfs partition is going to ask you if you want to mount then in the file system, I have a document partition in ntfs, so I am select it and define a mount point for the partition.
  9. after this the installer let you choose the medium for the installation, you can use a DVD or cd for the installation, mount an existing partition that contains the files for the installation, install from a premounted partition or from a nfs directory, I select the first one, install from a cd or dvd.
  10. next step is to let the program search automatically for the cdrom or set it yourself, I chose automatically.
  11. After the program detects the cdrom it show you a list of categories of software, you can choose here what groups of software you want to install, you can chose here to install everything or only some groups
  12. next step is to sellect the method of installation, you can select to install everything from the categories you selected, select the programs from every categorie (menu or expert) or newbie, I select the expert and select my own selection of software, you can select the full as this is going to give you a fully functional system and surely not problematic, its the best option.
    You can also choose to use a custom tagfile for a personalized installation, look for the section custom installation in this page.

    after this you must wait to the programs to install, the process is very very fast, my installation was 2.1GB and was pretty fast.
    Some observations are that now in the cd the categories for setup a develop machine or a server, there are no desktops in this cd, this make it a perfect option for setup a server if you need to.
    in the cd 2 comes the X server, kde, xfce and the X programs, and the internalization packages for kde.
    cd 3 is the extras and source for the extras cd, if you download the dvd version then all this is going to come in the dvd plus the sources for all the program
    in the A series you now select if you want to install the hugesmp, huge non smp or generic kernel, this is a change, in previous releases you selected this after the installation of the packages end.

  13. when the installation of the packages end, the setup is going to ask you to make a USB boot disk (a change, before was a floppy setup), I choose to skip the creation of the usb disk.
  14. Modem configuration, I skipped this one
  15. Installation of LILO, I choose simple, have always worked
    1. Selection of the resolution for LILO configuration, the default one is 1024x768x256
    2. Optional LILO append parameters for the kernel: blank
    3. LILO Destination: you can choose between Root, Floppy and MBR: MBR has worked for me always.
  16. Setup ask you to configure the network, choose Yes to configure
    1. Hostname: enter the name of your machine
    2. Domain: domain for the machine
    3. IP Address setup, you can choose between static ip, DHCP and loopback, I choose DHCP, my internet router give the IP address in my network
    4. DHCP hostname: in some cases you need to provide this.
  17. Services to Run: select the services that you want to start when the machine boot.
  18. Console font configuration: skipped
  19. Configure hardware clock: choose if the hardware clock is set to local time or UTC, in my case the machine is dual booted with M$ XP so I choose local time
  20. TimeZone Configuration: select your country
  21. Select default window manager for X: KDE!!!
  22. Set root password: you can skip this step if you dont want password for your root account, I choose to put one.
  23. Setup Complete: you can press ctrl+alt+delete to restart to your fresh new shiny and beautifully simple Slackware12!!! :P :D :) ;)
first boot
after the reboot you are welcomed to your new and shiny new Slackware 12 (oh yeah!!!!) linux, I login as root to make some changes to my system:

  1. change the default runlevel to 4, so when my machine start you are welcomed by the kdm instead of the console, if you want to keep the console at the start, you can start the x environment anytime by writing
    #startx
    to do this you need to edit the file /etc/inittab, to do this use the command
    #nano /etc/inittab
    you need to edit the line that says
    id:3:initdefault:
    to this
    id:4:initdefault:
  2. add a new system user to use as everyday account
    #useradd -g users -G audio,video,cdrom -d /home/usuario/ -s /bin/bash -m usuario
  3. add a password for my user
    #passwd usuario
  4. add usuario to the sudoers file so I can make super user actions using sudo, this is done by editing the file /etc/sudoers with the command
    #nano /etc/sudoers

    in the file I add the line
    usuario ALL=(ALL) NOPASSWD: ALL
    this allow me to make changes without having to provide my password.
  5. you can choose some global personalizations, to make them edit the file /etc/profile, in my case I like colors for ls, and see hidden archives with l
    #nano /etc/profile
    add to the end of the file
    alias ls="ls -sh --color=always" alias l="ls -shal --color=always"
    if you want to add personalization only to your account, add them to ~/.bashrc instead.

X11 configuration
to edit X11 configuration i edit the file /etc/X11/xorg.conf with the command
#nano /etc/X11/xorg.conf
the changes are:
  • change the layout of my keyboard to spanish, to do this I add the line
    Option "XkbLayout" "es"
  • I'm using a ATI graphics card so I change the driver to radeon instead of defaults vesa.
    to do this find the section "Device" and and change the driver.
    Section "Device" Identifier "VESA Framebuffer" Driver "ati" #VideoRam 4096 # Insert Clocks lines here if appropriate EndSection
  • Enable 1280x800 resolution of my laptop: to do this you need to add the line
    Modeline "1280x800@75" 83.91 1280 1312 1624 1656 800 816 824 841
    to the section "Monitor" and change to multisync by commenting a line and commenting off another, have to look like this
    # HorizSync 31.5 - 50.0 HorizSync 30-64 # multisync
    after this change the resolution in the file /etc/X11/xorg.conf, find the section "Screen", in the subsection "Display" change so it looks like:
    Subsection "Display"
    Depth 24
    Modes "1280x1024" "1024x768" "800x600" "640x480"
    EndSubsection
And of course the obligatory default desktop screenshot jajaja (scaled to 640x400 from 1280x1024)


ATI Graphics Driver
OFFICIAL ATI SUPPORT IN LINUX SUCKS!!!
The official driver complaints about the X release and die.

Custom Installation
Slackware come with so many packages, And now that X is modular there is a Gazzillion of packages, and I have to machines, so select the packages for both machines is a slow process, so I have decided to create my own personalized installation dvd.
In my case I started by copying the content of the 2 cds isos of slackware and store the result in another directory that I am going to use to create the personalized iso

$mkdir slackD1 $mkdir slackD2 $mkdir mySlack $sudo mount -o loop slack12Disc1.iso slackD1 $sudo mount -o loop slack12Disc2.iso slackD2 $cd myslack $cp ../slackD1/* . -r $cp ../slackD2/* . -r
for the installation process in slackware, the installer seeks in the series directory for a file called tagfile, this is the file that the installer read to know which packages install by default, and wich ones ask for installation in newbie mode and menu.
you can make your custom tagfile and add a 3 letters MS-DOS extension, so you can select a custom tagfile installation just by supplying the extension.
what I am gonna do is change the tagfile changing the packages that I don't want to be installed to OPT and rebuilding the DVD iso to have a media that always install my prefered packages.
the format of the tagfile is this

cpio:ADD cryptsetup:OPT cups:REC cxxlibs:ADD

you can see that there is the name of the package followed by a colon and a description for obligatory (ADD), optional (OPT), and recommended (REC).
I know most of the packages, so it can be quick the process, but in slackare 12 there are so many new packages, if you don't know what is some package for you can read the description in the directory, for example if we want to know what the package cpio-2.5-i486-3.tgz does we can read cpio-2.5-i486-3.txt, it says:

cpio: cpio (backup and archiving utility) cpio: cpio: This is GNU cpio, a program to manage archives of files. This package cpio: also includes mt, a tape drive control program. cpio copies files into cpio: or out of a cpio or tar archive, which is a file that contains other cpio: files plus information about them, such as their pathname, owner, cpio: timestamps, and access permissions. The archive can be another file on cpio: the disk, a magnetic tape, or a pipe.

if you want to see all the descriptions use the command

$for name in *.txt; do less $name; done

after change the file to eliminate the packages that you don't want (4 hours later, X series is soooo Large!!!), go to directory that have the content of the Slackware cds and make a iso image with the command

mkisofs -o ../slackware-dvd.iso \ -R -J -A "Slackware Install" \ -hide-rr-moved \ -v -d -N \ -no-emul-boot -boot-load-size 32 -boot-info-table \ -sort isolinux/iso.sort \ -b isolinux/isolinux.bin \ -c isolinux/isolinux.boot \ -V "SlackDVD" .

then burn with your favorite software, in my case k3b, you can also use nero on windows.
To use your custom tagfiles, when setup ask you for a method of installation, select the option custom tag.

Atheros Wireless
My Laptop is equiped with an Atheros AR5005G 802.11abg NIC (rev 01), to install the support download the driver from atheros, in my case the driver is called madwifi-0.9.3.1.tar.bz2, the steps to set up the driver are:
  1. extract the driver
    $tar -jxf madwifi-0.9.3.1.tar.bz2
  2. enter the directory of the driver
    $cd madwifi-0.9.3.1
  3. make the kernel modules
    $make
  4. install the kernel modules
    $sudo make install
  5. insert the kernel module
    $sudo /sbin/modprobe ath-pci
  6. configure your wireless with kwifimanager :D

VMWARE Workstation/Server
Virtualization is one of those "must have" program, it enables you to to run another OS inside it, it also let you work with multi tier applications, try new software, etc.
To install VMWare on Slackware 12 get the latest version from vmware.com, Version 6 installation is similar to the installation of version 5.5, the steps for the installation are:
  1. get the installer from vmware (the tar.gz version)
  2. unpack the package
    $tar -zxf VMware-whateverVersion-whateverRelease.tar.gz
  3. enter the directory of the unpacked vmware
    $cd vmware-distrib
  4. you will need to patch version 5.x to function properly, to do it get the patch from http://ftp.cvut.cz/vmware
    1. $wget http://ftp.cvut.cz/vmware/vmware-any-any-update109.tar.gz
    2. unpack it on the vmware directory:
    3. $ tar -zxf vmware-any-any-update109.tar.gz
    4. enter the directory of the unpacked patch
      $cd vmware-any-any-update109
    5. run the installer as root
      sudo ./runme.pl
      this is going to patch and then install vmware
    6. end, you dont need to follow next steps
  5. run the installer as root
    sudo ./vmware-install.pl
  6. the installer is going to ask a lot of questions, just press enter and say yes to everything jajaja
note: you may need to start the vmware services when the machine start, to start the services run:

$sudo /etc/init.d/vmware start

and the obligatory screenshot (linux mint bea running in vmware over slackware 12 of course).


Open Office
Damn M$ and its formats!.
Open office is the most capable office suit over linux, and its free.
Slackware Doesn't come with it but install it its a breeze
  1. get the rpm from openoffice.org
  2. unpack it
    $tar -zxf OOo_2.2.0_LinuxIntel_install_en-US.tar.gz
  3. Enter the open office unpack directory
    $cd OOF680_m14_native_packed-1_en-US.9134/RPMS
  4. install it as root:
    $rpm -i --nodeps --force *.rpm
  5. make it a symbolic link to /usr/bin
    $cd /usr/bin
    $sudo ln -s /opt/Openoffice.org2.2/program/soffice .
  6. run it!
    $soffice
Obligatory screenshot


NTFS-3G
I have a dual boot configuration, and have a "Backup unit" in ntfs, because of the limitations of fat32.
To use ntfs-3g on Slackware we will need to install fuse first, to do download the latest version from fuse.sourceforge.net
  1. get the latest version of fuse from fuse.sourceforge.net
  2. unpack it
    $tar -zxf fuse-2.7.0.tar.gz
  3. enter the directory
    $cd fuse-2.7
  4. compile and install it
    $./configure
    $make
    $sudo make install
and now the installation of ntfs-3g
  1. get the latest version of ntfs-3g from ntfs-3g.org
  2. unpack it
    $tar -zxf ntfs-3g-1.616.tgz
  3. enter the directory
    $cd ntfs-3g-1.616
  4. compile and install it
    $./configure
    $make
    $sudo make install
  5. next is to change the /etc/fstab to indicate what partition you want to load with ntfs-3g
    $sudo nano /etc/fstab
    for example the entry would look like this
    /dev/sda2 /mnt/docs ntfs-3g defaylts 1 0

problems
none of this is because of slackware of course ;)
  • X11 is so modular that you may forgot some package and the desktop manager is not going to start, make sure you have installed the package
    iceauth.
  • Use the last version of madwifi, previous versions may not compile
  • Use only the latest versions of anything you want to install, Slackware is just so new!!!

Updates
  • tnx to raskolnikov for the commentary on groups of my user
Datos personales